ESP32 based micro-controllers are great for IoT applications, and allow you to use low power communication protocols such as Bluetooth Low Energy.
Hardware and Schematics
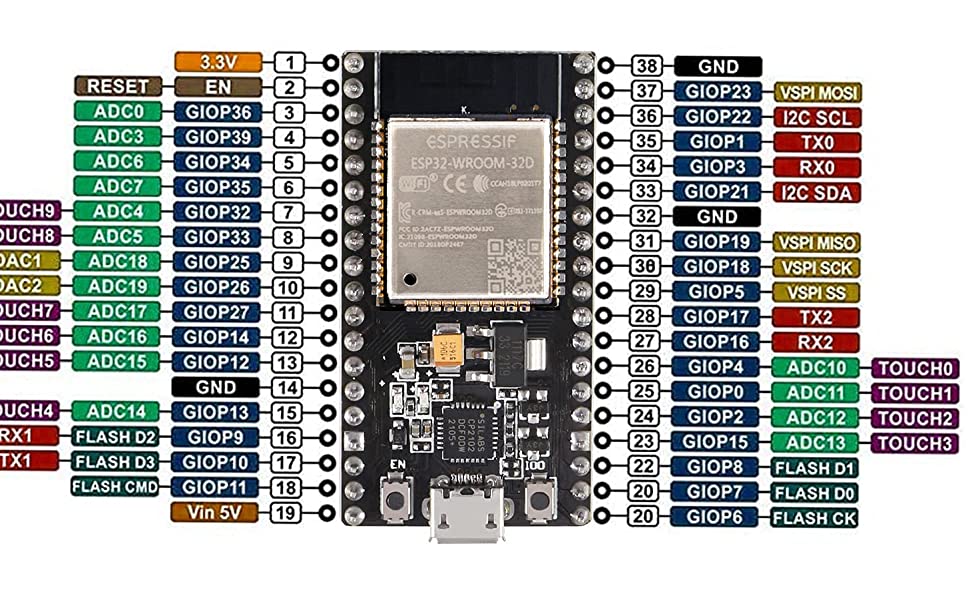
I’m using this ESP-WROOM-32 ESP-32S Development Board from Amazon, but these instructions and code will probably work for almost any ESP32 based device.
The following pinouts are used in the above schematic:
| Light # | Color | ESP32 GPIO Pin # | *ESP32 Physical Pin # |
|---|---|---|---|
| 1 | Red | GPIO23 | 37 |
| 1 | Yellow | GPIO22 | 36 |
| 1 | Green | GPIO21 | 33 |
| 2 | Red | GPIO19 | 31 |
| 2 | Yellow | GPIO18 | 30 |
| 2 | Green | GPIO5 | 29 |
| 1 | GND | N/A | 14, 38, or 32 |
| 2 | GND | N/A | 14, 38, or 32 |
These pin assignments can be changed by modifying the r1Pin, y1Pin, g1Pin, r2pin, y2pin, and g2pin variables located at the top of the btControl.ino file.
Connect the GPIO pins from the ESP-WROOM-32 to the anode of the LEDs, and the cathode of the LEDs to a 1kOhm resistor and then to ground.
The pinout of the ESP-WROOM-32 micro-controller is shown below.
Setup Arduino IDE
To program the ESP32, you will need to download the Arduino board packages for the ESP-WROOM-32.
To do this, open up your Arduino IDE and go to “File -> Preferences”.
In the settings tab, you will see a field named “Additional Boards Manager URLs”, add this URL to the field:
https://dl.espressif.com/dl/package_esp32_index.json.
If you already have other URLs in that box, separate them by adding a comma between them. Once you have added this URL, press “OK” in the dialog box to apply the changes.
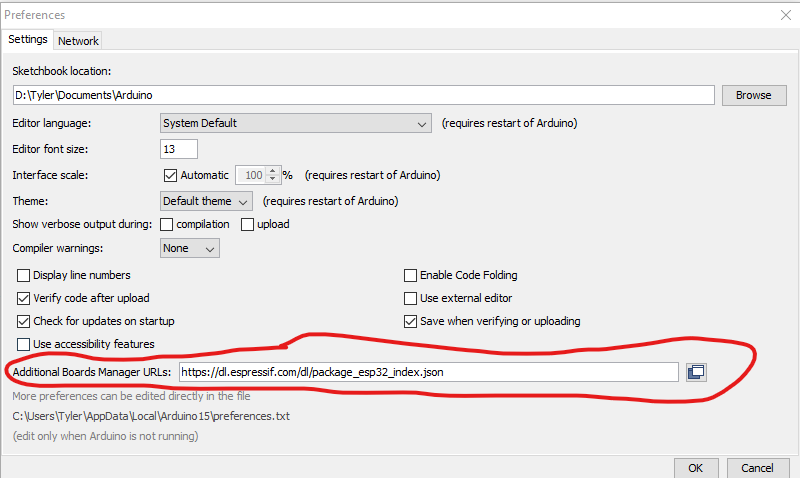
Enter your board URL to the field circled in Red and press "OK"
Program Device
Once you have the correct boards installed onto your Arduino IDE, you can then open up the source code bleControl.ino to program your device with.
To program your device with this software, select the “Node32s” board type in “Tools -> Board -> ESP32 Arduino -> Node32s”. Select the correct COM/tty port in “Tools -> Port”.
Press the upload button to compile and upload the program to the EESP-WROOM-32.
While uploading the program, you will have to press and hold the “Boot Button” on the ESP-WROOM-32. This button is located to the right of the micro USB connector, as circled in red in the image below.
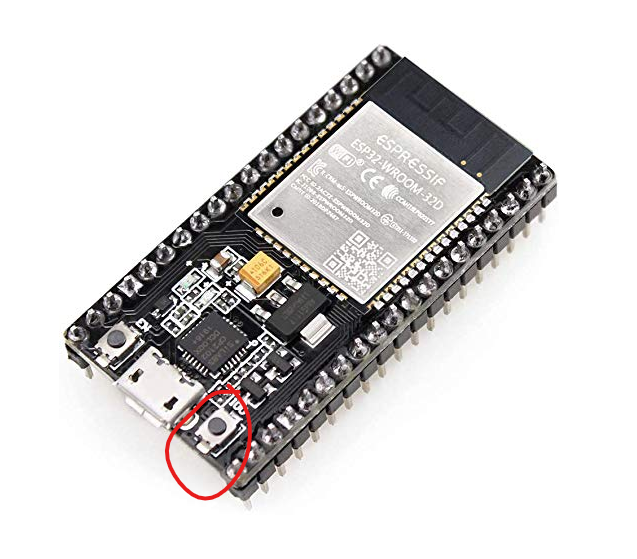
You will need to press and hold this button when starting the upload of your program.
How it Works
The program that is flashed onto the ESP-WROOM-32 is using BLE with the Nordic Semiconductor BLE Serial UART service to control the GPIO pins.
This is implemented using source code from this repository from Ian Archbell of oddWires.
The Nordic BLE UART service is a Generic Attribute Profile (GATT), which defines an RX characteristic, and a TX characteristic. When the RX characteristic is written to by the controlling device (i.e. your cell phone), the RX characteristic executes a callback which stores the written bytes into the receiveBuffer string.
This receiveBuffer is actually a C++ std::string, which allows us to check the length of the string to determine if there are bytes available for reading. This is used to implement the Arduio Stream-like interface that we use in our program to read in commands to parse and execute.
The parsing of commands is taken care of in our loop() function. If there are characters available from BLE, we append characters to our String message until we reach the ending delimiter character, which is the semicolon (;).
Once the delimiter is reached, we then compare the contents of message against known command strings, and if a command matches against message, then we execute that command.
Try it Out
You can try connecting your smartphone to the ESP32 using Nordic Semiconductor’s NRF Connect for Mobile app.
- Download For Android: Link to Google Play
- Download For Apple: Link to Apple Apps
After enabling bluetooth on your phone, you will be able to discover the ESP32 within the NRF Connect app.
Once you’ve paired with the device, you can select the RX characteristic and write a message to it.
Try out the following messages:
red1;yellow1;green1;off1;